
We share practical observations about where defects commonly appear in new builds and how inspection timing affects remediation options. The sections ahead map average costs, break down price drivers, compare inspection types and timing, offer checklists for scope, explain inspection ROI from a builder’s perspective, and provide concrete recommendations for selecting a qualified inspector.
Inspection pricing reflects time on site, the complexity of systems, and the inspector’s experience. For a standard final inspection, expect an average range of $300 to $500. That typically covers a visual assessment of structure, major mechanical systems, and finish items; specialty testing or multiple staged visits add to the fee. Treat the inspection cost as preventative spending. Finding defects early usually cuts remediation costs and provides documentation for warranty claims. Knowing these average figures helps you set a realistic budget and decide whether to add specialty tests or staged inspections.
To simplify budgeting, home size bands offer a fast reference for typical cost ranges. The table below lists common size categories, typical inspection fees, and scope notes so buyers can estimate fees based on home footprint and expected time on site.
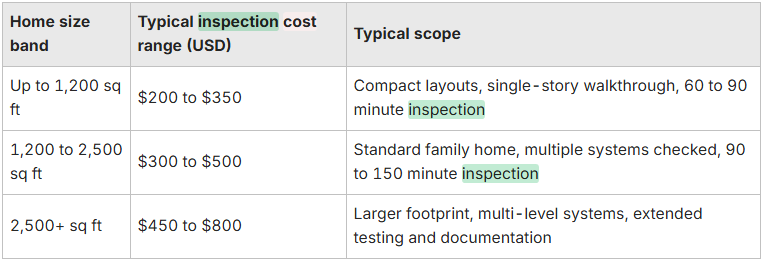
This size-based breakdown shows why square footage and layout complexity directly affect inspector time and cost. Larger homes require more time on site, which explains the price increases between bands.
Price bands depend on inspection type and home size. Final inspections often align with the $300 to $500 average, while staged visits like pre-drywall are usually cheaper but require specialised knowledge. For a modest home under 1,200 sq ft, expect a basic final inspection near the lower end of the range; luxury or large footprints push costs upward because of extra systems and access time. Specialty services, such as thermal imaging, sewer scope, or HVAC load testing, are add-ons that commonly add $100 to $300 each, depending on complexity. When planning, factor in a small contingency for travel or enhanced reporting if the inspector provides it.
Understanding these bands helps buyers weigh whether to combine staged inspections or book single comprehensive visits based on their tolerance for concealed risk.
Regional labour rates, local codes, and market demand cause meaningful geographic variation in fees; metropolitan areas often carry a 10 to 40% premium versus rural markets. Travel distance, licensing requirements, and local wage levels influence the hourly rate inspectors charge, and some jurisdictions require extra testing or documentation that increases cost. Home size multiplies time on site. Inspectors effectively bill for hours, so larger square footage, multi-level plans, and complex mechanical systems raise fees. When budgeting, include both a regional premium and a size multiplier and get a localised quote before scheduling.
Knowing the regional drivers helps you compare quotes fairly and anticipate cost differences between similar homes in different markets. That context leads into the variables that most frequently influence inspection pricing overall.
A small set of predictable factors drives inspection pricing: home size, construction stage, location, inspector qualifications, and the scope of services requested. Each factor changes the time required or the technical difficulty. For example, more square footage increases walkthrough time, early-stage inspections demand specialised inspection skills, and higher credentials usually command higher fees. Recognising these drivers lets buyers select the right mix of staged inspections and specialty tests to match their risk profile without overpaying. Providing a clear scope upfront reduces surprises and makes quotes comparable.
These primary factors create a framework for comparing quotes and deciding which inspections are essential versus optional.
Home size and build stage scale inspection time, and therefore fees. Larger or more complex homes require more walking, testing, and reporting. Pre-drywall inspections focus on framing, rough mechanicals, and envelope details; they’re often shorter but require specific expertise. Final inspections are broader and typically take longer. Older or warranty-stage homes may require additional diagnostic tests for settlement, mould, or system performance, which can increase the baseline fee. Match inspection type to build stage to balance cost and defect-detection value.
Aligning inspection selection with the construction timeline helps owners control expense while maximising the chance of catching defects early. Next, we cover how location and inspector experience further affect pricing.
Location sets the market rate and potential travel costs, while inspector experience, and certifications like ASHI or InterNACHI, shape hourly rates and report depth. Inspectors with construction backgrounds and extensive experience may charge more but deliver clearer, prioritised findings and usable punch lists that speed builder remediation. Lower-cost inspectors can be suitable for straightforward builds but may lack the new-construction nuance needed for pre-drywall or warranty-stage assessments. Weigh the premium for expertise against the reduced risk of missed defects and the downstream savings from well-documented findings.
Investing in a qualified inspector often reduces negotiation friction and warranty disputes, which naturally leads into the different inspection types and how they’re priced.
New construction typically uses staged inspections, such as pre-drywall, final/new-home, and an 11-month warranty inspection. Each has its own scope and cost range tied to decision points in the build timeline. Specialty inspections (HVAC balancing, sewer scope, thermal imaging) are add-ons. Which inspections you schedule depends on risk factors like custom systems, site complexity, and how comfortable you are with concealed risk. The comparison below clarifies scope and expected cost ranges so buyers can plan inspections strategically.
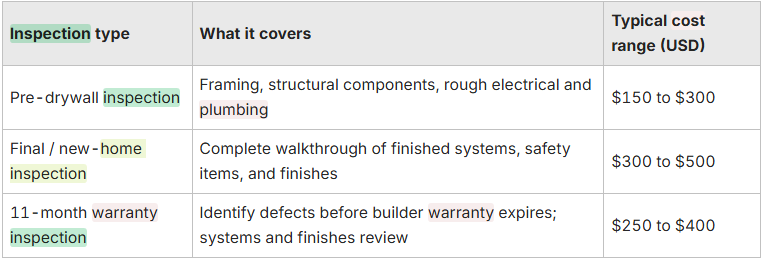
These staged inspections complement one another: pre-drywall catches concealed problems early, the final inspection reviews the finished product, and the 11-month visit preserves the warranty window for remediation. From Livit Construction’s experience, timing these visits correctly raises the odds of efficient corrections and reduces rework.
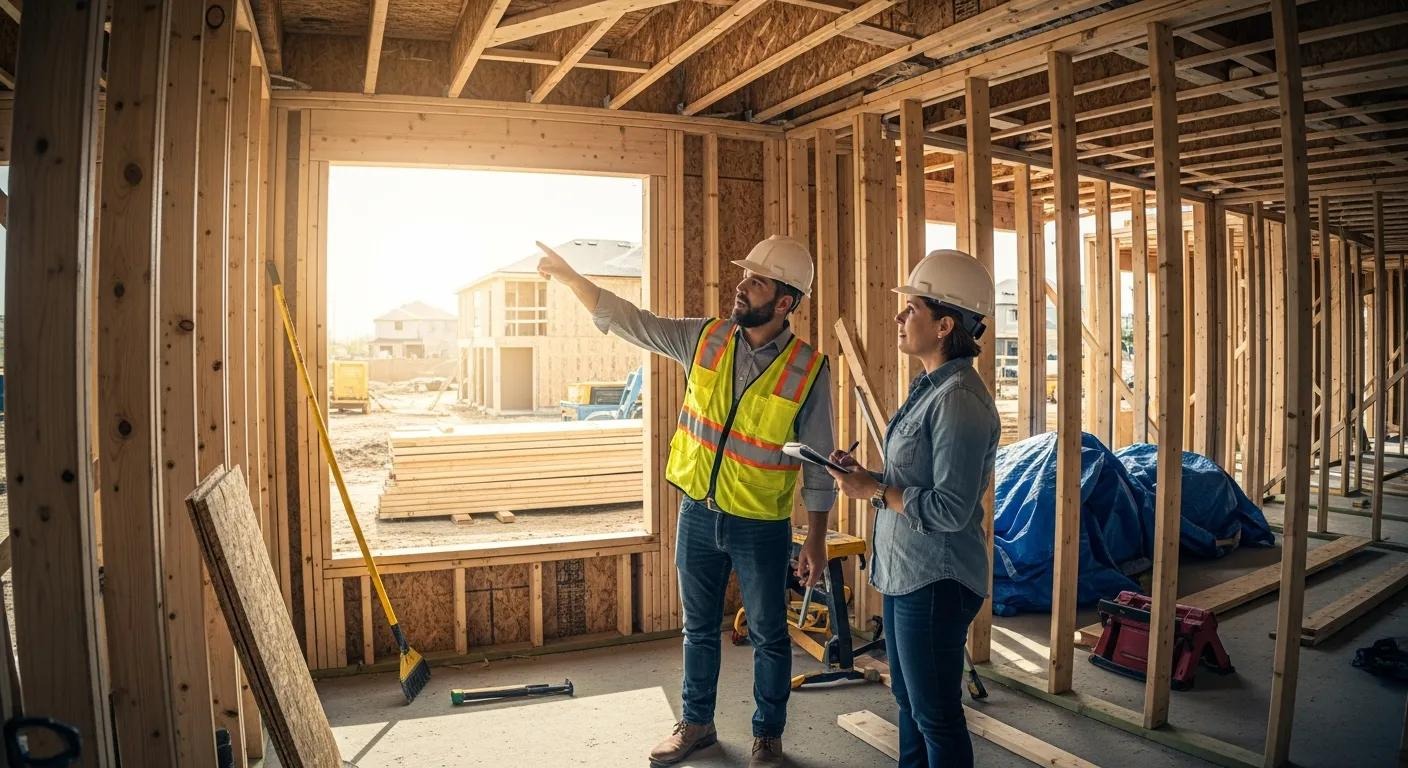
A pre-drywall inspection reviews framing, structural connections, and rough electrical, plumbing, and HVAC work before insulation and drywall hide them, typically costing $150 to $300 depending on home size and inspector expertise. This stage reveals defects, like improper joist connections, misaligned plumbing stacks, or missing fire-stopping, that are far cheaper to fix before finishes go in. Because pre-drywall checks require a trained eye for concealed workmanship, choose an inspector experienced with new construction to maximise detection. Early discovery reduces downstream repair complexity and keeps warranty responsibilities clear.
Scheduling a pre-drywall visit gives you leverage to correct issues before they’re concealed, which is a key part of the inspection value proposition discussed below.
An 11-month warranty inspection, performed shortly before the builder’s warranty expires, typically costs $250 to $400 and focuses on defects or performance issues covered under the new home warranty. This visit targets items that surface after occupancy, such as settlement cracks, finish problems, plumbing leaks, or HVAC performance shortfalls. The main benefit is documentation: a professional report at month 11 creates formal evidence to support warranted repairs and prompts timely builder remediation. That investment often offsets repair costs that would otherwise fall to the homeowner after the warranty ends.
Capturing defects within the warranty window protects the homeowner’s investment and establishes a clear remediation timeline.
A comprehensive inspection walks through the home’s major systems and components, including structure, exterior envelope, interior systems, and site drainage, to link defects to likely causes and remediation needs. Inspectors follow a checklist that balances safety priorities, code considerations, and functional performance, producing a report owners use to build a prioritised punch list for the builder. A thorough inspection reduces ambiguity by separating safety-critical items from cosmetic issues and by documenting findings with photos and recommended next steps. Below is a checklist-style table that ties systems to inspection checks and common issues.
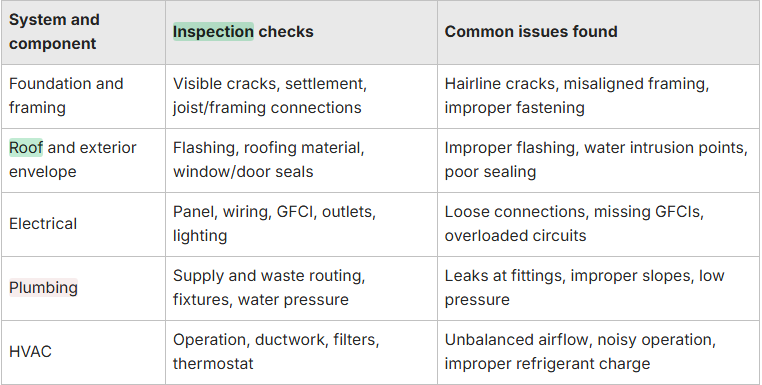
This mapping clarifies how inspected items, specific checks, and common defects relate; understanding these links helps buyers decide which systems may need specialty testing.
Structural and exterior checks cover the foundation, framing, roof structure, exterior cladding, flashing, windows, doors, and site grading to spot defects that cause water intrusion or structural distress. Inspectors look for discontinuous flashing, improper sealants, poor grading away from the foundation, and framing members incorrectly installed. Early verification of these components prevents moisture-related damage and costly corrective work once finishes are in place. When defects are found, clear documentation directs the builder to fix root causes rather than apply superficial repairs.
Knowing common exterior failure modes helps homeowners request targeted remediation and shifts attention to interior systems that affect daily use.
Interior checks include electrical safety (panel, breakers, outlets), plumbing supply and drainage (fixtures, visible piping, water flow), HVAC operational testing (heating/cooling cycles, thermostat accuracy), and interior finishes (doors, trim, cabinetry) for installation quality and function. Inspectors run simple operational tests, such as cycling the HVAC, running water through fixtures, and testing GFCIs, to validate system performance under normal conditions and to surface issues like poor air balance or persistent leaks. Documenting these findings creates an actionable punch list that separates safety and performance items from purely cosmetic concerns.
A well-organised interior systems review connects observed defects with repair priorities, which leads into why inspections are essential from a builder’s perspective.
From a builder’s view, inspections supply objective verification of workmanship, generate actionable remediation lists, and protect both buyer and builder by documenting issues and timelines for correction. Inspections cut ambiguity about defect causes, which enables more efficient fixes and reduces repeated callbacks. Livit Construction emphasises inspection-driven accountability: when buyers secure professional reports at key stages, builders get clear, prioritised tasks that help coordinate subcontractor work and close out warranty items on schedule. Those benefits translate into measurable savings compared with ad hoc repairs after occupancy.
These benefits set up concrete examples of how inspection findings protect homeowners and strengthen negotiation positions.
Inspections lower financial and safety risk by creating a documented baseline of a home’s condition, reducing the chance of surprise repairs and providing evidence for warranty claims or resale disclosure. When an inspector documents a structural or system defect, that finding enables prompt correction under warranty or informed negotiation at closing, protecting the homeowner’s investment. From a safety angle, inspections catch hazards, like improper electrical work or poor drainage, that could pose immediate risks if left unaddressed. Clear documentation also supports future maintenance planning and transparent resale disclosures.
These protective effects highlight the practical value of inspections and lead into how they change builder accountability and negotiation dynamics.
Inspections create leverage: pre-drywall findings let the builder correct concealed issues before they’re covered up, final inspections formalise punch lists before closing, and 11-month checks force remediation while warranty coverage still applies. This staged accountability reduces the need for complex retrofits and limits disputes over causation. A professional inspection report delivers precise remediation instructions and photos that help builders prioritise subcontractor work and speed warranty closures. For buyers, that means clearer timelines and stronger leverage when negotiating repairs or holdbacks.
When buyers use inspection reports strategically, they turn findings into enforceable action items rather than vague complaints, which brings us to how to choose inspectors who produce high-quality reports.
Choosing the right inspector means evaluating credentials, new-construction experience, sample reports, and communication style so you get actionable documentation rather than vague observations. Seek inspectors with recognised certifications like ASHI or InterNACHI and demonstrable experience with pre-drywall and warranty-stage assessments. Request a sample report to check for clear photos, prioritised findings, and practical remediation recommendations. Report quality often correlates with the value you’ll receive. Livit Construction recommends prioritising inspectors who understand construction sequencing and translate findings into precise punch-list items.
These selection criteria help buyers find inspectors who produce usable findings and prepare homeowners to convert reports into remediation actions.
Insist on inspectors with credentials such as ASHI or InterNACHI, proven new-construction experience, and sample reports that include photos, severity ratings, and repair recommendations. Experience with staged inspections, such as pre-drywall, final, and warranty, signals familiarity with when defects appear and how to document them effectively. Also confirm the inspector carries professional liability insurance and clearly states limits of liability. These attributes lower the risk of missed issues and increase the report’s practical utility during negotiations.
Choosing an inspector with these qualifications improves the odds of catching hidden defects and getting a report that supports efficient builder remediation.
Start the report by reviewing safety and structural priority items, then work through functional and cosmetic issues; convert high-priority findings into a clear punch list with required corrective actions and target completion dates. Use the report’s photos and severity ratings to communicate precisely with the builder and to document warranty claims if needed. Prioritise fixes that affect weatherproofing, structural integrity, and electrical/plumbing safety, and defer cosmetic items if appropriate. Present the prioritised list to the builder with a reasonable remediation timeline backed by the inspection documentation to facilitate orderly corrections.
Treat the inspection report as a contract-level document: it should translate findings into specific remediation tasks and timelines both homeowner and builder can act on.
Following this practical sequence helps ensure inspection findings lead to timely corrections, preserve warranty coverage, and protect the homeowner’s investment.
